Showing posts with label colouring. Show all posts

Monday, March 14, 2011

Baby Boy Card


The card above I made as a sample card using my new baby digital 'Baby Gift Box'ID: NV-DS0028 and the sentiment is from my new word art sheet 'Baby Set 1' ID:NV_WA0019 . I found a wonderful sketch supplied by the 'Catch the Bug' crew. As yet I don't own any of the dies or a cutting machine so I used my trusty scallop scissors to make the scalloped circles. More practice is needed by me to stitch in a circle as I ended up just manually moving the needle one stitch at a time, *laughs* and it's still wigglely.
I coloured my digital first, spending the most amount of time on the hatbox itself and used 6 different copic colours to achieve that gradual shading. I used a white pen to add the little white dots onto the hatbox to create a pattern. The items inside the hatbox are very small, so I only used 2 colours on most of them. After it was dry it was then cut out, the edges shaded and pop dotted onto the card to add dimension. I brushed all the edges of the card with Aegean Blue chalk to soften the hard edges. The rest of the card was just a matter of putting it together. I also used a copic pen B95 and created a little splattering (fingernail flicked on the brush nib) in some of the areas.

The inside is very simple. I used the same paper as the front and stitched around it. The verse is from my word art sheet and the edges where also brushed with chalk.

Card Info:

  • Normal yellow card stock to make the base
  • Background paper by Paper Chic Item#1642, so pretty with candy stripes one side and white baby dots on red on the other side.
  • Copics: B000,B00,B21,B93,B95,B97 (hat box colours)
  • Pink ribbon with 2 silver threads by Celebrate
  • 6mm Pearls (coloured with copic E95)by Vivaldi
  • Little teddy bear charm from Ribtex
  • Flowers are a no name brand, I do remember picking up the white ones in the bridle section and I coloured the center of them with a red copic marker.
  • VersaMagic is the chalk ink


  • I am entering this card in the following wonderful challenges:

  • Catch the Bug - Challenge Scallops
  • Sunday with Crissy - Challenge # 15 Stitching
  • Cutie Sunday -Challenge #135 Colour Combo
  • The Corrosive - Challenge #107 Sketch Time
  • My Grafico - Challenge Monthly
  • Southern Girls - Challenge Flowers
  • Simon Says - Challenge Anything Goes


  • Thank you for visiting.

    Sunday, March 13, 2011

    Baby Girl Card


    The card above I made as a sample card using my new baby digital 'Baby Gift Box'ID: NV-DS0028 and the sentiment is from my new word art sheet 'Baby Set 1' ID:NV_WA0019 . I couldn't go past the wonderful sketch supplied over at the Midnight Madness crew. I think that my stitching was a lot better on this card and I did some test runs trying to get the tension right to sew on paper.

    I coloured my digital first, spending the most amount of time on the hatbox itself and used 6 different copic colours to achieve that gradual shading. I used a white pen to add the little white dots onto the hatbox to create a pattern. The items inside the hatbox are very small, so I only used 2 colours on most of them. After it was dry it was then cut out, the edges shaded and pop dotted onto the card to add dimension. I brushed all the edges of the card with pink petunia chalk to soften the hard edges. The rest of the card was just a matter of putting it together.

    The inside is very simple. I used the same paper as the front and stitched around it. The verse is from my word art sheet and the edges where also brushed with chalk.

    Card Info:

  • Normal pinkish card stock to make the base
  • Background paper by Paper Chic Item#1625, so pretty with candy stripes one side and tiny white four petaled flowers on the other side.
  • Copics: E01, E95, R20, R81, R83, R85 (hat box colours)
  • Pink ribbon with 2 silver threads by Celebrate
  • Pink Bling by Paper Xtra
  • Little teddy bear charm from Ribtex
  • Flowers are a no name brand, I do remember picking up the white ones in the bridle section and I coloured the center of them with a red copic marker.
  • VersaMagic is the chalk ink


  • I am entering this card in the following wonderful challenges:
  • Priscillastyles - Midnight Madness Sketch Challenge #94
  • Incy Wincy Designs - Challenge #84 Pastels Colours
  • Digital Tuesday - Challenge #101 Welcome Little One
  • Whoopsie Daisy - Challenge - Pile on the Flowers
  • One Stitch at a Time - Challenge #53 Glitter & Gems
  • Craft your Passion - Challenge #48 Anything Goes


  • Thursday, March 10, 2011

    Easter Cross Card CDAC Embellishment challenge 19


    Nana Vic's Digitals is proud to be hosting round 19 of the Embellishment Challenge. My digital line of stamps mainly centers around my 2 favourite seniors 'Nana Vic' and her good mate 'Mr Jones', however I do from time to time venture out of their world to create special stamps for different occasions. I am blessed to share with CDAC this new design especially created for this challenge, at the same time of creating this design I also put together a new 'Easter 1' word art sheet.

    With Spring in the air and Easter so close, it's time to celebrate new beginnings. The embellishment challenge is to use flowers and lots of them. Your project is to include 2 or more flowers in any size or colour or medium.

    'Easter Cross' and 'Easter Set 1' word art are both available now in my store. The 'Easter Cross' is also available for free for the next two weeks to all that join in the challenge at CDAC. So if you'd like to pick up the 'Easter Cross' for free considering joining a wonderful site that is always fun and a great place to hang out.

    I coloured the cross twice and glued them back to back with a piece of string running between the two circles. I cut a larger circle in the front of my card and stitched the background paper inside and around the circle. The string I made sure that I caught in the stitching so that the cross part of the card can rotate. I used the circle that I cut out of the front as a border for the sentiment to be displayed on inside.

    All the flowers are from my stash and the white netted one with the gold wire is an embellishment that my sister made for her daughters wedding. There was sugar coated almonds inbetween each of the folded petals, even tho I ate the almonds the flower I keep to use again. I created the arrangement around the white netted one and I also used 2 pin sticks that I'd made to add just a touch of bling.

    Below is the inside of the card and I decided that I needed to keep it simple. The only embellishment is the stitching around the sentiment.


    My good friend Carol also made a card for me using the 'Easter Cross' Please be sure to pop over to her blogsite and leave her some lov'n and to check out her details.


    I am giving away $30 is Vouchers for 3 lucky winners in this challenge.
    A random winner we receive a $10 voucher to spend in my store.

    2 more winners will receive a $10 voucher chosen by myself and DT Ladies.


    I look forward to seeing the wonderful designs that will come through from CDAC embellishment challenge.

    I am also entering this card into the following challenges:
  • For Fun Challenges - Spring
  • The Pixie Cottage - Challenge #60 - Sketch and/or Easter
  • Simon Says - Anything Goes!!!!!
  • Tellen Place - 2 Embellishments
  • Catch the Bug - Anything Goes!
  • If the Shoe Fits - #69 BE Inspired Spring
  • Flourishes - #108 Timeless Tuesday Sew

    Thank you all for looking.

  • Saturday, February 12, 2011

    Tea and Scone Card


    With Valentines only a few days away and as this was my freebie this week to the ladies in my group at CDAC, I created a card for a special friend of mine. The cards that have come through this week so far have all been fantastic. Enjoying a cuppa tea and a chat would have to be right up there on the top of the list of my favourite pasttimes. I used my own digi 'Tea and Scone' and the sentiment is from 'Sharing a Cuppa' a word art sheet that I put together just for the tea and coffee lovers. The little heart that is holding the bushells tea bag is a free craft project that is being shared for free on the CDAC website this month. Thanks Denise for providing a template and a step by step, the heart was perfect for this card.

    The Card:
  • Digi and Sentiment can be found Here.
  • Papers and card stock from stash
  • Lace, flowers, ribbon and sequin beads from my daughters stash *Smiles*
  • Copics: teaset; C0,C5,B000,G40 Roses; R20,R22,R29,R59,R83,R85 leaves; YG06,YG97 servette; C5, B93, B00 doily; E000,YR24,YR31,E13,E53

    Challenges your might enjoy this week:
  • Stamp Something - Something for your Valentines
  • Totally Gorjuss - Challenge #67 - Love
  • Fussy and Fancy - Sweet Treats Use something edible
  • Crafty Anns - Challenge #35 Love Is All Around
  • The Stamp Man - Challenge #16 Hearts theme
  • Winter Wonderland - To The One I Love
  • Crafty Catz -Challenge 69 - Valentines/Love
  • TTT Challenge - "Love Gift"
  • Make it Colourful - Shadow and Depth
    Thank you for stopping by.
  • Thursday, February 10, 2011

    Tulips Card, Blending with copics


    I don't get a chance to make cards very often but I find that when I do it's always a fun time and I especially enjoy this time if I've been inspired. Zoe from 'Make it Colourful' was my inspiration this week with her new challenge to blend blue and purple together. As I'm still learning how to use my copics this challenge seemed perfect and as soon as I read about it, I knew the digi that I was going to use.

    Patti G. had just released a new line that she had been working on and had just announced they were available in her etsy store. So many cute ones to choose from but I was heading there to get my hands on her delightful vase of tulips. I'd seen the image in colour on an amazing card that her sister Sandi had made for their mother.

    So now I had the colour challenge, digi and all that was left was to find a sketch that I could use to help me put something together. I didn't have far to look as I know that Priscilla Styles 'Midnight Madness' challenge is always so rewarding. The sketch this week is great with a choice of 2 different levels to pick from.

    The card info:
  • Digital tulips in vase from Patti G.
  • Copic: tulips;BV13,V09,V17,B93 leaves;YG03,YG06,YG63,YG97 vase;B000,E41,C4
  • Digital paper (purple) designed by SG_Refresh_DMI_12x12_Sherbet
  • Pearls, coat hanger, coloured string, gold heart and tags from my stash.

    I'm entering the following challenges:
  • Make is Colourful - Challenge #5 – Blend Blue and Purple Together
  • Patti's Creations - Challenge #13 - Birthday for a Mother
  • Priscillastyles - Midnight Madness Sketch Challenge #90
  • A Spoonfull of Sugar -Challenge #138 - Let's see some love
  • Cute Card Thursday - Challenge #151 - Hearts & Flowers!


    Thanks for stopping by.

  • Monday, December 27, 2010

    Before the Year Ends

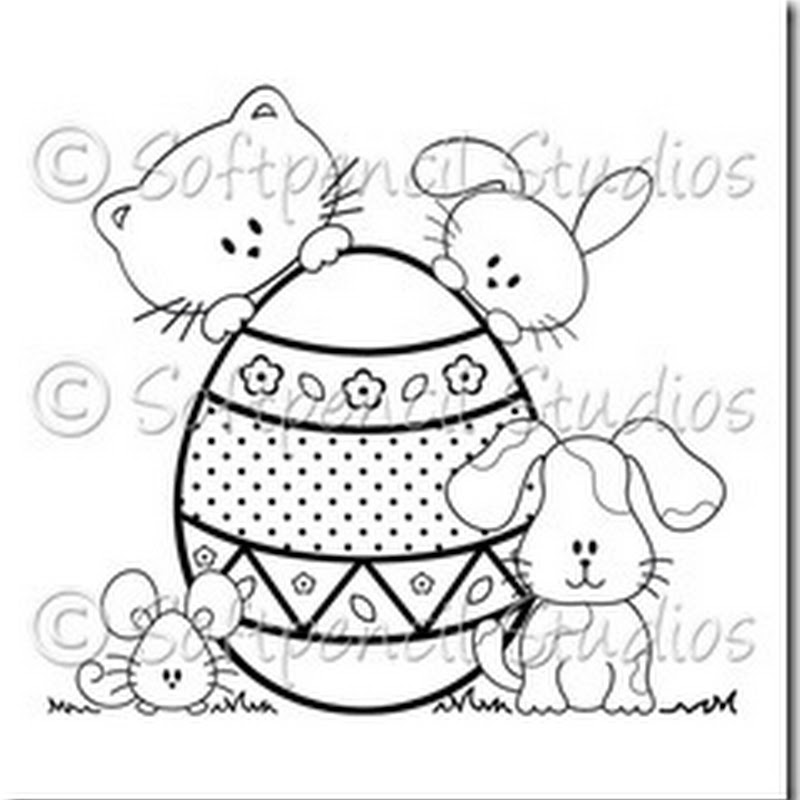
    Before the year 2010 ends I wanted to reflect on some of the highlights for the year. I started blogging in the middle of April as a way to share some of the ATC’s (Artist Trading Cards) and digital scrapbooking layouts that I have created. In my second post I ever did, I was creating and sharing digitals with fellow bloggers and as it was Easter time I put together a cute little bunny with flowers and an egg template.

    It wasn’t long before I discovered just how generous the blogging community is with so many different types of ‘Blog Candy’ up for grabs. While trying to establish a network of like minded blog sites, it was always a bonus to find sites that not only shared their ideas but offered gifts for following their site and I am always happy to promote their candy on my own site. I even won a couple throughout the year.

    Within my first month I had written and shared my first tutorial with a step by step 3d ATC. I was busy researching the wonderful world of digital stamps and was heading in this direction with my own artwork. At the end of May I released my first digital stamp called ‘Nana Vic Cowgirl’ and my new range of digital stamps called ‘Nana Vic’s’ was born. With the support and encouragement of my followers and customers throughout the year I am so proud to share with you now a total of 13 digitals that feature ‘Nana Vic’, 1 digital that introduced ‘Mr Jones’, 5 miscellaneous digitals and 13 word art sheets on various topics. Let allow me to personally thank you all for your continued interest in my digitals.

    In July I created a sister blog site called ‘Nana Vic’s Digitals’ to host my digitals in a place that is dedicated to them alone. I wanted to keep within the blog community and decided that a blog site could act and feel just like a shopping cart and still allow the freedom of allowing customers to see updates, comment and share digitals that they liked with others. I also used ‘Nana Vic’s Digitals’ as a place to host my free digitals and I happily give away 22 individual designs.

    To help me promote my digitals I am very fortunate to have 2 of the best ladies on my design team. Carol from ‘Craftn Granny’s Card Shack’ has never failed to delight and impress me with her amazing creations throughout the year. Beccy from ‘Beccy’s Bits’ has created stunning and beautiful projects that have been truly inspirational. If you’d like to check out some of their gorgeous creations please pop over to their site. I have some exciting news with where we will be heading with new challenges starting in the new year.

    In June I stumbled upon one of the most exciting sites for me for the year. ‘Crafters Digital Arts Center’ has been an amazing community and I proudly host one of the groups there. With nearly 250 members in my own group ‘Nana Vic’s Digitals’ and with close to 5000 members on the site, this site is bursting with ideas and is by far one of the fastest growing communities. There really is so much to do with 6 fresh challenges each fortnight hosted by various groups, a massive gallery, free craft projects, tutorials and videos. Each individual group has it’s own unique style of forum and discussions as each host has their own style of digital art that they share with their group. Please consider joining my group as we have an exciting year planned ahead. If you are already apart of my group I would like to encourage you to share the link with your friends so they can join us. I have made some very special friends through my group and I can not express deeply enough just how important some of you have become to my life. *Special Hugs* to all the ladies of ‘Nana Vic’s Digitals’ group. My direct link http://priscillastyles.ning.com/group/nanavicsdigitals

    My highlight medium for the year was my purchase of the fantastic copic pens. These alcohol ink based pens can only be described as shear magic. With the use of special papers to print the digitals out on and going back to basics with colouring I’ve been delighted with the results that can be achieved. I did have to use You Tube to help me with the basics on how to use these pens but with a little practice I’ve had so much fun venturing into the world of card making. Zoe from ‘Make it Crafty’ has been wonderful with amazing videos and her own inspirational site with digitals and of course her very handy online store.

    The rest of my year pretty well continued in a pattern of producing digitals, keeping up to date with the ladies of my forum, creating ATC’s monthly and creating cards where time permitted.

    I am looking forward to an exciting 2011 with some new changes happening to this site and the start of challenges. So until then, I want to wish each of you a safe holiday season filled with special memories shared with loved ones. May the New Year find you inspired and your creative juices overflowing with ideas and projects.

    Below is the card that I made for my grandson Mason. (Bear digital will be available soon)

    Inside (New Birthday Word Art available soon)

    I made each of my 3 year old grandsons their own colouring in book. I used a spiral A5 sketch book. I used pliers to remove the wire spiral binding and printed out 35 of the digitals that I had created this year onto the paper. Where possible I did add a little sentence to the digital. They also recieved a travelling colouring in set to go with the colouring in books. I know that they will have fun with these little books and it was my way of sharing my artwork with the families.


    Sunday, November 7, 2010

    JENLEE'S GUIDE TO COLOURING A DIGISTAMP – with coloured pencils

    Well this is a nice little bonus for everyone. I emailed JenLee asking for her permission to use her Christmas Mouse Sleeping card as an example in my last little Step by Step creating a digital. This was her reply so I'm very happy to pass it onto everyone. I adore JenLee's method of colouring and I hope that others will be able to benifit from her expertise. All the photos on this page are done using this method by JenLee and you can see many more of her amazing creations on her website ABC-Art, Bellydancing & Crafting

    Prepare:

    1. Chose digi-image, cut and paste to a MS Word document
    2. Click on digi and resize to usually no larger than 10cm (4 inches) either in wide or breadth
    3. Print on inkjet printer -settings "fast normal"," black ink only" onto 160 gsm cardstock, - I am not sure if this is an international weight, but it's a about the weight of scrapbooking cardstock. I always use the cheapest I can find because it doesn't affect the final outcome of the coloured digi at all
    4. Heat set print to prevent smudging and bleeding
    5. Trim the digi to a little larger than the finished size you require. (I always leave a little larger piece on the right hand size to "test" colours next to each other
    6. Here's the tutorial for the colouring technique I devised

    JENLEE'S GUIDE TO COLOURING A DIGISTAMPwith coloured pencils

    You will need :

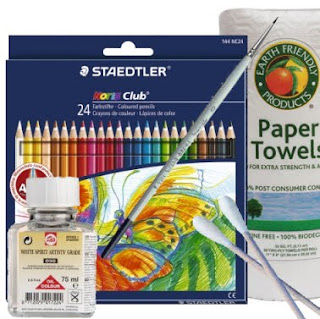
    Printed digistamp preferably laser printed but you can print on a inkjet printer, on the “fast normal” setting, and if you can, use black ink setting only and then it must be heat set using a heat gun or over the toaster – DON’T SCORCH IT!
    Coloured pencils They don’t need to be watercolour pencils – I use a set of 24 Staedtler Noris Club pencils (R50 at Supermarket)
    Artist’s white spirits aka Odorless Turpentine / odorless mineral spirits
    No 0 (and no 00 optional) paintbrush and/or cotton buds (Q-tips) I have both but seem to use the no 0 brush mostly
    Tiny container for turps Like a milk bottle cap or anything that size
    Absorbant paper A tissue or a kitchen roller towel sheet to dry your brush after rinsing in the turps between painting different colours

    Now this is the EASY way to do it, without flops…

    1. It’s best to work on a sheet of white paper or card.

    2. Using your paintbrush or a cotton bud, paint a layer of turps over a small area that you want to colour. I usually start with the skin. You will see that the turps soaks into the paper and makes it a grey colour, and goes beyond the borders of the image. This is fine because it evaporates and disappears completely once dry. (I usually use a half-capful and pour it over the image, and wipe off the excesss with a tissue.
    3. Now while the turps is still damp (it will stay damp enough to work on for at least 30 mins), use your flesh coloured pencil and colour in the arms, legs, face, etc. You will feel that the pencil glides on VERY smoothly. Try and colour evenly, and leave no white spaces, although these can be rectified very easily later. For darker colours you will need a “light” hand.

    4. Once you have coloured all the skin, again using the or a cotton bud brush and turps, paint over the area that you have just coloured with the pencil. You will find that the colour seems to liquify and “smoothes” out. It will remove a lot of the colour and a paler, chalky look will remain.

    5. Then go onto the next area you want to colour, and repeat the process, until your whole digi is coloured.

    6. At this stage you will be able to see any white, uncoloured areas show up clearly. To fix those, colour with the pencil and paint with the turps.

    Now your digi is coloured and if you are satisfied with the result, leave it somewhere to dry.

    *Your digi is dry when the damp patch all around the coloured image has disappeared. When it is dry you will see that you have a beautifully coloured image and there would be nothing wrong in leaving it that way.

    *If you would prefer it to have some shading, you can go over the already coloured areas with the same colour pencil to do your shading – you need a little heavier “hand” here and must press a little harder.

    *However, if you are fortunate enough to have two or three shades of the same colour in your set of pencils, you could experiment with using orange to shade yellow areas, dark green to shade lime green, and a pale brown to shade the skin areas, etc

    *Once you have done the shading, use the paint brush and turps again over the whole coloured area to smooth it and merge the newly coloured areas with the previously coloured areas.

    TIPS :
    Some colours are “stronger’ than others and you will need to have a very “light” hand for these if you want a pastel look.
    The more even your first colour goes on, the more even your final result, although the turps is a miracle worker.
    Use small circular movements when painting over the coloured area with the turps, it seems to blend more easily.
    The bigger the contrast between your light and dark shading, the more dramatic your effect and will give your finished product the WOW factor. This technique is not always suitable for some digital designs, it just doesn’t seem to work on an image for a baby card for me.
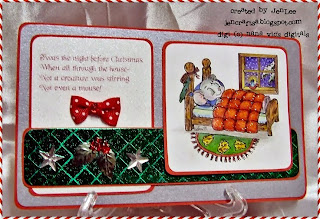
    There you have it – it’s flop proof and really inexpensive cos you can use both watercolour pencils and regular coloured pencils for this technique. I suggest that you buy a couple of sets from different manufacturers because the shades differ from pack to pack and this will help you in your shading., eg, the little eiderdown was coloured using four different shades of regular colour pencils, the last being bright orange which has created the puffiness to pop out off the plane.

    .
    For those of you who are a little more confident … attempt to use two or three colours on the first layer you put down : here, look at the bedside mat – the areas closest to you colour in lime green - press fairly hard – and then less pressure where you like the blending of lime green and grass green to be, then take your grass green pencil, lightly go over the lime green to blend the two and then increase the pressure with the grass green Then less pressure with the grass green for the blending with the dark green, take a dark green to colour lightly over the grass green and then increase to full pressure dark green on the furtherest edge of the mat. Use your cotton bud to blend all the colours into each other seamlessly

    Once the coloured image is dry, I trim it down to my required size and start putting the card together. I love using my rounded corner punch - it gives the layers a finished look. I try to pick out a dominant colour and layer the coloured image into that, and as for embellishments I use just about anything!


    Thank you JenLee.

    Tutorial Creating a Digital

    I've been asked several times, how do I get my digitals to be so detailed and clean?
    After considering this question and how best to answer it, I thought I'd share with you a step by step of how I create my quality digital:
    You may click on any of the images for a closer look.

    1. I start with a doodle or an idea in pencil. (Mine are usually done at work on a scrap of paper)


    2. I will work on this idea in my sketch book still in pencil. When I'm happy with the general look I will trace over the pencil lines using .5 black pen. I errase the pencil lines with a soft rubber. I don't worry too much about mistakes as I know that I have the computer to back me up. =)

    3. I scan in the line drawing at 300 dpi. into Paint Shop Pro 9 (PSP9). I use just a normal brush set at .4 and have the foreground colour set on black and the background colour set on white. I can alternate between the two colours with a click of the mouse. White acts as a rubber and black to redo / add lines. You can see by the example below that it still looks pretty messy. I save it at this stage as a png.

    4. I change programs and opened that saved file in Illustrator CS5. I clicked 'Trace' set on default or simple. (my new all time favourite magic button). I don't use anything else in here yet as the program I'm still learning. So I simply export this image now again as a png file.

    5. Open again with PSP9. Check all the lines. Again using just black and white with the setting the same as above I will check each line and make any final changes. It's worth noting here that as I am a digital colourist as well, I will take particular attention to making sure areas are sealed. (No holes, so that when you fill an area with colour it doesn't seep into unwanted areas.)When I'm happy that I have produced a digital that I would use I will move onto the final step. Using the magic wand to cut away the areas that I want to be transparent, I will zoom in and add one pixel at a time if I have too (eg the little holes between the strings of the mat). I call this my semi-transparent digi. I save my digital as a png again and also save as a jpeg file. (Saving as a jpeg will automatical fill in the areas again with white).

    6. Here's the finished digital.
    Example 1. Coloured using the computer.

    Example 2. As a designer nothing gives me more pleasure than when another artist uses one of your art pieces and creates something with it. This is a wonderfully hand coloured example by JenLee, she made a gorgeous Christmas card and added her personal touches thoughout. Check out the lite candle in the window and the beautiful blending and shading. You'll find more of her stunning work on her website HERE!

    I hope that this little step by step has given you an insight into the process that goes into bringing you quality digitals to use in your projects. Thank you all for your continued support and encouragement.

    Awards

    Scrap N' Art Journey
    Thanks Angie
    Make it Crafty
    Make it Crafty
    Thanks Zoe
    Patties Creation Challenge
    Patties Creation Challenge
    Thanks Pattie
    Midnight Madness (x 2)
    Thanks Priscilla and DT