

After considering this question and how best to answer it, I thought I'd share with you a step by step of how I create my quality digital:
You may click on any of the images for a closer look.
1. I start with a doodle or an idea in pencil. (Mine are usually done at work on a scrap of paper)

2. I will work on this idea in my sketch book still in pencil. When I'm happy with the general look I will trace over the pencil lines using .5 black pen. I errase the pencil lines with a soft rubber. I don't worry too much about mistakes as I know that I have the computer to back me up. =)
3. I scan in the line drawing at 300 dpi. into Paint Shop Pro 9 (PSP9). I use just a normal brush set at .4 and have the foreground colour set on black and the background colour set on white. I can alternate between the two colours with a click of the mouse. White acts as a rubber and black to redo / add lines. You can see by the example below that it still looks pretty messy. I save it at this stage as a png.
4. I change programs and opened that saved file in Illustrator CS5. I clicked 'Trace' set on default or simple. (my new all time favourite magic button). I don't use anything else in here yet as the program I'm still learning. So I simply export this image now again as a png file.
5. Open again with PSP9. Check all the lines. Again using just black and white with the setting the same as above I will check each line and make any final changes. It's worth noting here that as I am a digital colourist as well, I will take particular attention to making sure areas are sealed. (No holes, so that when you fill an area with colour it doesn't seep into unwanted areas.)When I'm happy that I have produced a digital that I would use I will move onto the final step. Using the magic wand to cut away the areas that I want to be transparent, I will zoom in and add one pixel at a time if I have too (eg the little holes between the strings of the mat). I call this my semi-transparent digi. I save my digital as a png again and also save as a jpeg file. (Saving as a jpeg will automatical fill in the areas again with white).
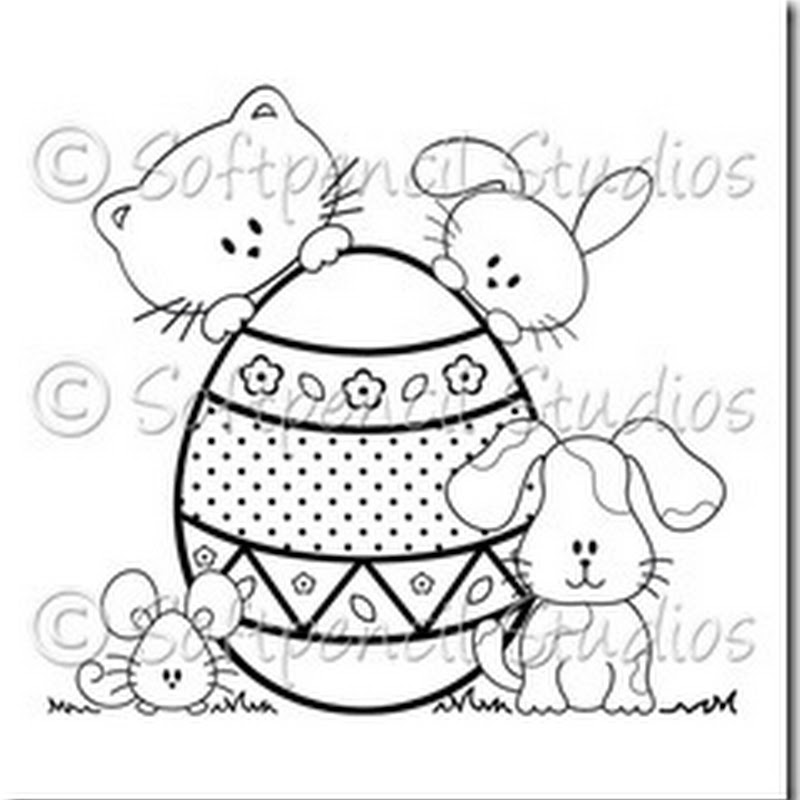
6. Here's the finished digital.
Example 1. Coloured using the computer.
Example 2. As a designer nothing gives me more pleasure than when another artist uses one of your art pieces and creates something with it. This is a wonderfully hand coloured example by JenLee, she made a gorgeous Christmas card and added her personal touches thoughout. Check out the lite candle in the window and the beautiful blending and shading. You'll find more of her stunning work on her website HERE!
I hope that this little step by step has given you an insight into the process that goes into bringing you quality digitals to use in your projects. Thank you all for your continued support and encouragement.


awesome!
ReplyDeleteWow, this is a lot of work before your digi is finished. Nice te read how that works. Thanks for sharing. ;)
ReplyDeleteI also want to thank you for your nice comment on my blog. :)) I'm glad you like my work.
I think you are a amazing artist. Your creations are so beautiful and detailed ( I hope I write this right ). I really love your style.
This little mice is also so cute, just like the images from grandma. They are awsome. ;)
Hugs, Rosalien