

Resizing and Enhancing your images for uploading.
The original image straight from my digital canon 6 megapixel camera came in at 2.16mb (huge) and the higher the quality of your camera the higher you can expect your original image to come in at. I'll be using a card I made for my daughters 17th birthday in July. The digi is Nana Vic Daisy Chains.
Please note that you can click on any of the images for a better view, they open in a new window.
Resizing
When I open up the original image in my graphic program (Paint Shop Pro 9) the image appears at only 34% {Image 1} to fit onto the screen. So that an indication as to how big the original is. When I scroll the image out to 100% {Image 2} all that fits on my screen is one little corner.
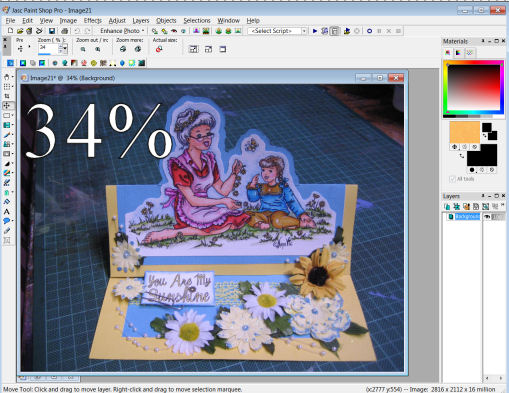 |  |
Image 1 | Image 2 |
The first thing that needs to be done is to reduce the size of the original image. There are a couple of ways to do this and each will have their prefered method. I'll be showing you just 2, Resize (most commonly used)and Zoom Resizing (not so common). I'll also follow up the how to with an example of the difference between the to methods and hopefully explain why it happens.
Resize | Zoom Resizing |
 |  |
In PSP9 you will find resize option under the tab >Image>Resize. The image above shows the setting used. Only one tip when using this method is to make sure the ratio is ticked to locked. Most programs will give you the option to resize in either percent or print size. I prefer percent as I know how big my image was and by how much it needs to be reduced to fit onto the screen. Pick your settings and click OK. Crop your image to the size you want. | This method you'll reduce the size of the image by going to your Zoom function. In PSP9 you can zoom down by clicking the size you want or use your middle scoll button to just scoll the image down to 25%. Your image should be fitting on the screen easily. Move your mouse curser away from your image (or else you will end up with a little curser where you don't want it). Go to your keyboard and click > Prt Scr (print screen). Next go to the tab Edit>Paste>Paste as a new image. Everything that was on your screen is now your new image. Crop your image to the size you want. |
 |  |
| Above is a close up of your image resized using the resize method. | Above is a close up of your image resized using the zoom method. |
Which brings me to what happened in very simple terms. When you reduce an image the pixels (the tiny little squares) that make up an image are being changed and the overall resolution is becoming smaller. The more pixels you have the sharper and cleaner an image is. If you would like a more detailed explaination then I'd like to pass on this link to Micheal Furtman's site. He gives it to you straight in laymans terms and it's an interesting read.
Saving
At this stage your images are good enough to save.
Save your image as a jpeg. (There are other format types eg png, tiff, gif but jpeg is the fastest and most accepted format)
When choosing the compression level, keep quality in the medium to high range. I prefer to save my compression factor at 20. Click the option button to open up the compression menu. You can see a great example of how the resolution is reduced in the 3 saved images below and I give your what KB each image equals. The lower the KB (Kilo Bytes) the faster your image loads on the screen. This is very important and only you can decide if your image needs the details or you can sacrafice the quality for speed.
 | |
| Check your Compression Setting | Normal: Balances quality and size = 6.2KB |

 |  |
| Maximum: Preserves fine detail for large file sizes = 90.7KB | Minimum: Yields some quality loss for small file sizes = 2.5KB |
Enhancing
Advanced Enhancing of your image before saving.
Using the Zoomed Resized image below are 6 examples on how to enhance your image to create the best possible outcome for your uploaded images. I recommend that you have a play with your programs, see what you like and don't like and find the formular that works for you. If you don't do any of the colour enchancing options at lest try to clarify or sharpen your image as it will help clear up the messy pixels that get reduced during resizing.
 |  |
Normal | One Step Photo Fix |
 |  |
Sharpen More | Colour Contrast |
 |  |
Colour Balance | Clarify |
I hope that you have enjoyed my first tutorial and that you got something out of it. I would like to hear your feedback.
*Hugs* Nana Vic


No comments:
Post a Comment
Thanks in Advance to taking time to leave me a comment, they sure do brighten my day.
*Hugs* Nana Vic / Nightowl